Baked French Fries

I love a good french fry! But most fries don’t really fit into a healthy lifestyle, unless you make them at home, and skip the deep fry! I make these so often it never occurred to me that I should write down the recipe and share all of the goodness! I’ve tweaked the ingredients and the amounts over the years and finally hit the sweet spot!

These are very crispy and you won’t miss the extra oil. šŸ™‚ You’ll just have to decide if you want to share them or not! šŸ˜‰

HOMEMADE FRENCH FRIES

(makes 6 servings)


Ingredients:

  • 4 large russet potatoes
  • 1/4 cup olive oil
  • 1/4 grated parmesan cheese
  • 1 T. Everything seasoning (or something similar)
  • 1/4 t. cayenne pepper
  • pepper
  • sea salt

Directions:Ā 

  1. Preheat oven to 460Ā°.Ā 
  2. Line a large baking sheet with parchment paper (helps the crisp factor).
  3. Cut potatoes into french fry shapes. The smaller and thinner you slice, the crispier they’ll get!
  4. Add potatoes, oil, parmesan cheese, seasonings and pepper to the bowl (salt comes later).
  5. Bake for 30-40 minutes (depending on thickness), turning once or twice halfway through to crisp all sides.
  6. Remove from the oven and sprinkle with sea salt.
  7. Enjoy!

*These store in the fridge well for a few days too! Just pop them back in the oven or toaster oven to reheat and maintain the crisp!

Nutritional info: 193 calories per serving, 10 g. fat, 22 g. carbs, 4 g. protein

Portion Fix containers: 1.5 yellows, 1 tsp., 1/2 blue


What’s on SALE this month?

Current Groups

Cheeseburger Salad

When we are all running in different directions for kids’ activities and events, we have what we call FFY night – “fend for yourself”. There are almost always leftovers, salad fixins, and other quick options to choose from…and cereal in case of emergencies!

Last night was one of those nights! When I scanned the fridge, the first thing I saw was lettuce I had already chopped up for the week, a jar of pickles and a leftover burger. CHEESEBURGER SALAD! I’ve seen some different recipes circulating the internets and theĀ Pinterest, so I used a couple of those for inspiration and ultimately created my own. šŸ™‚

My husband is doing a keto diet right now, and this salad is keto-approved! šŸ™‚

*I made an individual serving for my salad, but if you were making enough for the whole family, or leftovers, you can use the following amounts. For less…use less! šŸ˜‰

INGREDIENTS
Salad
  • 1 lbĀ lean ground beef (or turkey)
  • salt & pepper to taste
  • 1-2 garlic cloves (minced)
  • 2-3 heads of romaine (or whatever lettuce you like)
  • 1 cupĀ tomatoes (chopped)
  • 3/4 cup Cheddar cheese (shredded)
  • 1/2 cup Pickles (diced)
  • 1/2 sweet onion (sliced or diced)
Dressing
  • 1/2 cupĀ mayo (I used avocado mayo)
  • 2 roma tomatoes (diced)
  • 2 tspĀ mustard
  • 1 tspĀ white vinegar
  • 1/2 tspĀ Everything” spice mix (or paprika)
  • 5-6 drops of liquid Stevia (or sweetener of choice)
INSTRUCTIONS
  1. BrownĀ ground beef in a panĀ over mediumĀ heat. Season with salt & pepper. Stir fry, adding garlic and breaking up the pieces with a spatula, until the beef is browned. Drain any excess fat.
  2. Meanwhile, add mayo, tomatoes, mustard, vinegar, seasoning and sweetener to a small bowl, mix and set aside. Adjust sweetener to taste. Refrigerate until ready to serve.
  3. Combine the remaining salad ingredients in a large bowl. Add any other burger toppings you like. Add the ground beef. Toss with dressing and enjoy!


Check out my upcoming Groups!

What’s on SALE?

Healthier Instant Pot Zuppa Toscana

I LOVE a warm bowl of soup…especially when it’s freezing ass cold outside! My phone informs me that it feels like -3Ā° at the moment. I might need to take a BATH in this soup!

This Zuppa Toscana REALLY hit the spot. Only trouble is…I made it and didn’t have time to eat it right away. I thought I had planned it out to a T! I knew exactly how much time it would take to make in my Instant Pot – which isn’t long by the way! I freaking LOVE this thing! I just hadn’t allowed time to defrost the meat! DANGIT!

So the second it finished cooking, I had to run out the door to take my daughter to dance. I quickly blended up a chocolate peanut butterĀ Shakeology for the road, but knew that the steamy warm goodness would be there waiting for me when we returned. I didn’t even take off my coat. I filled up a bowl and slurped it down! SOOOooo good! And with an Instant Pot…SOooooo fast! (Just make sure you have thawed your meat first!) šŸ˜‰

Ingredients

    • 2 Tbs olive oil
    • 1 medium onion, diced
    • 1 lb ground mild Italian turkey sausage (or use this recipe if you only have the ground turkey)
    • 3-4 cloves garlic, minced
    • 3 large bakingĀ potatoes, unpeeled, halved long-wise and sliced into 1/4-inch slices.
    • 3 carrots sliced
    • 6 cups chicken broth
    • 2-3 cups fresh baby kale
    • 3/4 cup milk (unsweetened nut milks, 2% or half and half if you like to live dangerously!) šŸ™‚
    • salt & pepper to taste

Instructions

    1. Using the “saute” function of the Instant Pot, heat the olive oil. Add onions and cook until they begin to become translucent.
    2. Add meat, crumbling up into smaller pieces and cooking until browned.
    3. Add garlic and cook about a minute – until it starts to smell all nice and garlicky!
    4. Drain off excess grease if desired and return to pot.
    5. Add potato, carrot slices and chicken broth.
    6. Lock the lid into place and set to “sealed.”
    7. Cook at high pressure for 5 minutes on theĀ Manual setting.
    8. When cooking finishes, allow a natural pressure release for 10 minutes, followed by a quick release.
    9. When pressure valve has dropped, remove the lid and add kale to the pot. The heat from the soup will wilt the kale as you stir.
    10. Pour in the milk or half and half and desired amount of salt and pepper and stir to combine.
Makes about 6 servings.
Recipe inspiredĀ from This Old Gal
Ā 
Fix containers: 2 cup serving, 1 yellow, 1 red, 1 green

What’s on Sale This Month?

Current Groups

Crack Slaw

There’s a reason this is called ‘crack slaw’.

It’s easy to stay on track when you find delicious food you could eat again and again. We fight over leftovers with food like this. šŸ™‚ It’s got a great flavor without pasta or rice to fill you up and make you feel bloated.
This is so quick and easy to make, too! Great for meal prepping for a week of healthy lunches/dinners. If you’re following a container nutrition plan (like 21 Day Fix) this is great! No yellows! Ā Those precious yellows can be hard to avoid…you won’t even miss the carbs. It’s also paleo-friendly!

IngredientsĀ 
1 pound lean ground turkey (or beef)
1 T. sesame oil (any oil would work)
2-3 cloves garlic – minced
3 green onions – chopped
1/2 large head green cabbage – chopped
1 carrot – shredded
1/4 cup broth (chicken/veggie whatever)
3 T low sodium soy sauce or liquid aminos
1/2 t hot sauce
1 t. vinegar (apple cider or white work fine)
1/2 t. ginger (fresh would be great! Dry is fine too.)
4-5 drops of stevia extract (or small amount of sweetener of choice)
salt & pepper to taste
Directions
Brown turkey or beef in skillet, seasoned with salt and pepper. Meanwhile combine soy sauce, hot sauce, vinegar, ginger and stevia. Once the meat is cooked thoroughly, remove from pan, drain and set aside. Add oil to pan and sautĆ© onions, garlic, carrot and cabbage. Add the broth. Cook until cabbage is as tender as you like. Add sauce mixture and meat. Mix to combine and enjoy!Makes 4 servings: 1 redĀ and 1 green


What’s on sale this month?

Simple Healthy Ramen

Quick second blog post today cause I shared my lunch on Facebook and lots of peopleĀ wanted the recipe. This seemed easier than privately messaging everyone who asked for it.

Remember back in college when we were dirt poor and didn’t know how to cook?!

Ramen to the rescue!

This isn’t the ramen we made in college…

But it’s become my new obsession! I’ve made this at least three times in the last week.

I buy millet and brown rice ramen at Costco (no sodium packets included). And then I use my own broth and fixins to make it deelish! This took me about 10 minutes start to finish! Less than 300 calories and 8 grams of protein in the noodles alone.


My Health Ramen Lunch

*serves 2 (or 1 if you you’re hungry and/or don’t like sharing)


Ingredients:


  • 1 t. sesame oil (or your fave oil)
  • 2 cloves garlic – minced
  • 1/4 tsp ginger (I used powder. Fresh is always nice.)
  • 2 cups broth (chicken, veggie, whatever)
  • 1/4 cup sliced mushrooms (fave variety)
  • 1 T. reduced sodium soy sauce or liquid aminos
  • 1 ramen cake (I use Lotus Foods millet and brown rice)
  • 1 cup leafy greens (spinach, kale, etc)
  • 1 carrot – grated
  • 2 green onions – sliced
  • 1 hardboiled egg (or lean protein of your choice, or skip it!) šŸ˜‰


Directions:

  1. Heat oil in sauce pan over medium heat. Add garlic and ginger. Saute, stirring frequently, untilfragrant (1-2 minutes).
  2. StirĀ in broth, soy sauce and add mushrooms.Ā Bring to a boil.
  3. Add ramen cake. Reduce heat and cook for 2-3 minutes until loosened. (Follow the directions on the package.)
  4. Add greens, carrot and onions. Stir until greens begin to wilt (1-2 more minutes).
  5. Serve and enjoy! (Careful! It’s blazing hot! Just like when you tried to eat ramen in college and it almost burned your face off!) šŸ˜‰ 

    fun little ramen cake

Just for fun…let’s compare the nutrition labels! Pay specific attention to the ingredients! And sodium! OMG!

College:

More ingredients than I can count or pronounce! And 830 mg of sodium!!!??? In HALF of a serving! And everyone knows if you’re making a package of ramen, you’re eating the whole thing! That’s 1660 mg of sodium!Ā The American Heart Association recommendsĀ an ideal limit of no more than 1,500 mg per day (no more than 2,300 milligrams (mgs) a day).


Not College:

2 Ingredients: organic brown rice flour and organic millet. Sodium: ZERO mg. Ummm…ya…no brainer here. And here’s the thing, it tastes amazing!

If you try it, leave a comment below and let me know what you think. šŸ™‚


What’a on SALE this month?

Instant Pot Rice & Beans

This has quickly become one of my very favorite recipes to make in my Instant Pot. I have been using my Instant Pot almost once a day since I bought it back on Amazon Prime Day. As we speak, I have a sick kiddo at home and I am making homemade chicken stock for chicken soupĀ later (both in the IP).

It makes weekly meal prep a breeze! I can cook brown rice in half the time that my rice cooker used to take. It makes PERFECT hardboiled eggs every single time! The peels just slide off – no joke! It doesn’t matter how fresh or how old the eggs are either…the pot doesn’t discriminate. I’ve made dozens already…never disappointed.

I make homemade mac and cheese for the kids in about 15 minutes. You can use frozen or thawed meat for most recipes. It’ll even make pasta, veggies, potatoes, and even cheesecake!!! The possibilities are endless it seems! I have just scratched the surface! šŸ™‚

A little bird has informed me that it will likely be on sale (close to 50% off) on Black Friday! So keep your eyes open for that, and shop/learn more here:Ā Instant Pot

And on to the recipe:

ip_rice_beans

INGREDIENTS

  • 1 cup dry black Ā beans (red might work too)
  • 2 cups brown rice (I used short grain.)
  • 4.5 cups water
  • 1 cup salsa
  • 1 tsp cumin
  • 1 tsp onion powder
  • 1 tsp garlic powder
  • 2 tsp chili powder
  • 1 tsp sea salt (optional)

DIRECTIONS

Use manual setting for 30 minutes.

Allow a natural pressure release for at least 15 minutes.

*You can double and freeze leftovers! My husband even put it into the food processor and made veggie burgers with it! šŸ™‚

What’s on SALE this month?

aip_logo_small

Grilled Veggie Tacos

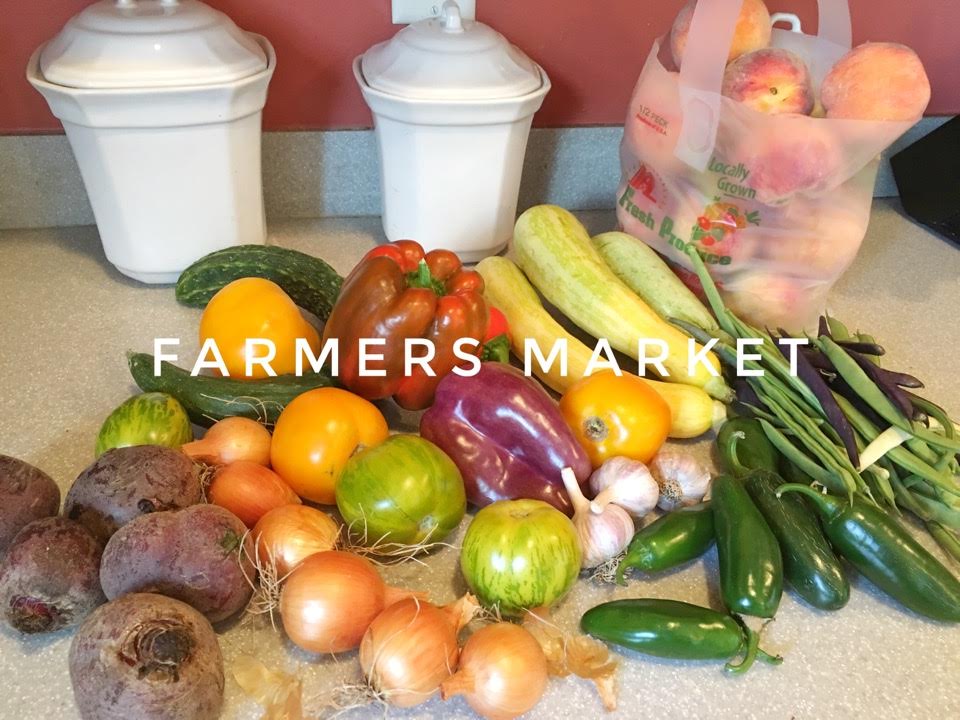
These tacos were inspired by a Saturday morning trip to the Brighton, Michigan Farmer’s Market. We stopped at the Stone Coop stand to buy some fresh, local organic (and non-gmo) veggies! I came home with a couple HUGE bags full of goodness! Check it out!

market1

I have been scouring the googles, Pinterests and internets these days for some tasty vegan recipes…since my husband recently decided to do a trial run eating a vegan/plant-based diet. Of course that decision means that I have also been eating mostly vegan foods…since of course I am the one who does the meal planning, shopping, prepping and cooking! I’m always up for a challenge though…so it’s all good! šŸ™‚

market2

I have always said that I think I could easily be a vegetarian. I don’t often crave meat and could literally LIVE on fruits and veggies. My only sticky spot is eggs and cheese! I really love both, and giving them up would be a struggle. I’ve done without both for a week though…and haven’t perished. Yet!

It is difficult, however, given that we have 4 kids who have NOT decided to become vegan – or vegetarian even – at this particular time. I am not one to make that decision for anyone, including my kids. SoĀ that means I’ve beenĀ preparing different meals for them. And that, my friends, is not something I think I could do for the long run! I can see exposing them to more and more meatless meals and plant-based options, but unless they say, “Mom, I want to be a vegan”, I will have to get creative!

Another conundrum is that I just don’t like to ‘call’ myself anything in particular. I don’t like to draw a line in the sand and say, “never again will I ____”. You know?! So for the moment, we are eating ‘mostly vegan’ food, and doing lots of reading, research and soul-searching to see if it’s something we could see ourselves sticking with, at least for the foreseeable future.

Ok…so back to the recipe. You don’t have to be a vegan, vegetarian or Michigander to enjoy these! Especially this time of year when the veggies are fresh! It was a taste sensation and my husband declared this recipe to be a KEEPER! There was a ton of the veggie filling leftover that we made more tacos with the next day and added to brown rice bowls.

grilled_veggie_tacos


GRILLED VEGGIE TACOS

INGREDIENTS:

2 Tbsp. coconut oil
1 medium onion (red, sweet, whatever!) – diced
2-3 garlic cloves (minced
2 bell peppers – chopped
1 jalapeƱo, minced or chopped (the more seeds you keep, the spicier these will be)
1 can of black beans, drained and rinsed
1 cup fresh mushrooms, chopped
1 tsp. ground cumin
1 tsp. paprika
1 tsp. dried oregano
3 cups fresh spinach, chopped
sea salt and black pepper to taste
6 or 8 tortillas (sprouted, whole grain, whatever you like)

*You could really get creative here and add lots of different veggies like sweet potatoes, squash, carrot, etc.


EXTRAS:

vegan cheese
sliced avocado
fresh cilantro
lime juice
salsaĀ (whatever you like)

DIRECTIONS:

  1. In a large, deep skillet over medium or medium-low heat, add coconut oil, onion, garlic and peppers (including jalapeƱo) with a littleĀ sea salt. SautĆ© for 15 minutes until softened and translucent. You donā€™t want them to brown, so reduce the heat if necessary. Cook it slowly so everything gets soft and sweet.
  2. Add black beans, mushrooms and spices. Mix everything together and continue cooking for 5 minutes.
  3. Add spinach and continue cooking for a few minutes, until spinach wilts. Add salt and pepper to taste and remove from heat.
  4. In a large pan or skillet, sprayed with cooking spray, assemble the tacos. Put enough of the veggie filling in the tortilla that you can flip to brown both sides. Place avocado slices on top of the filling along with some chopped fresh cilantro and a squirt of fresh squeezed lime juice. *Feel free to throw some vegan cheese in there as well, but with the avocado, I didn’t think it really needed it!

That’s it! Enjoy all of the veggie goodness!

If you are using the 21 Day Fix, the container count is: (per taco) 1 yellow, 1/2 red, 1 green, 1 blue (avocado slices)

WHAT’S ON SALE THIS MONTH?

Spring! 7 Day Salad Challenge

It’s Spring! Now if the weather would just get with the program!

I’ve been testing out some new and revisiting some of my old favorite salad recipes lately. It’s hard work, but somebody has got to do it! Every day I chop, mix, marinate, whisk and eat my way through the results.

OH! And I’ve done some of it LIVE on Facebook! Have you seen that new feature? It’s actually quite fun to see what others are up to in real-time and fun to share some of my daily chaos with people who don’t mind seeing the real me…crazy hair, imperfections and all!

I recently shared 2 of my favorite salads.

Here is my Clean Eating Taco Salad with ‘Secret Sauce’:

The finished product:

taco

And here is my “Hot Mess” Pasta Salad:

The finished product:

pasta_salad

7_DAY_SALAD_BANNER

Join my upcoming FREE 7 Day Salad Challenge and get my FREE eBook with all of my favorite salad and dressing recipes!

Group starts on April 11. We’ll just commit to eating one healthy salad every day for 7 days. Our bodies will thank us for it!

Click the link below to join.

CLICK HERE TO JOIN!

Programs mentioned in the videos that use the container system:

Grab one of these amazing programs and hop into my next support group where I’ll help you get results and stay on track.

What’s a Challenge Group? Read more!

Mmmm Monday – Blueberry Pancake Muffins

Well these were super easy peasy to make and quiteĀ delicious! Is it wrong that I want to hide them from my kids?

It never fails, when I make a healthy ‘treat’ for myself on the weekends, that I could enjoy for the entire week, the kids have them gobbled up beforeĀ the week even starts. And they found these right away because the house smelled amazing! They were like vultures, trying to pop steaming hot muffins fromĀ the pan fresh out of the oven! Maybe not the ‘smartest’ vultures! šŸ˜‰

I am starting the 21 Day Fix Extreme again this week, and these are approved for the meal plan! šŸ™‚ I like them because they are not sickeningly sweet – but just enough to satisfy a little sweet tooth without making you feel like you need MORE!

blue_muffins


So here is how I made them:

Blueberry Pancake Muffins

*I made 24 MINI muffins! If making larger muffins, you’ll need to adjust the baking time.

  • 1 1/2 cups almond flour (I get mine at Costco – but you can also find Bob’s Red Mill and other brands)
  • 1/4 cup plain Greek yogurt (I like Fage)
  • 2 T. coconut oil
  • 2 T. honey, maple syrup or sweetener of choice (I used coconut sugar for this one)
  • 1 tsp. vanilla extract
  • 1 tsp. baking soda
  • 1/4 tsp. sea salt
  • 2 eggs + 2 whites
  • 1 cup fresh or frozen blueberries (or ANY berries!)


Directions:

  1. Preheat oven to 350 degrees andĀ spray your muffin tin with cooking spray.blue_pan (7)
  2. Place all of the ingredients except the berries into a blender or food processor and pulse until smooth – it will be thickish.
  3. Fill the muffin cups 1/2 – 2/3 full andĀ spoon the berries on top. Poke them in a bit and they will sink as they bake.
  4. Bake for 10-15 minutes, until the tops are lightly browned and spring back when you press them.
  5. ENJOY! (and/or HIDE from you kids!)


Nutritional Info:
Serving size = 4 mini muffins!

Containers: 1/2 yellow, 1 blue, 1/4 red, 1/4 purple, 1 tsp

Programs that useĀ the container system:

CLICK HERE to see what’s on sale this month!

CLICK HERE to join my next challenge group for daily support, accountability and motivation!

Creamy Garlic Salad Dressing

When I was little, my mom used to make that Good Seasons salad dressing that you but in the packet and mix up yourself. You know what I’m talking about right?!

She had this cute little glass cruet that she mixed it in and kept it in the fridge. Almost homemade!

I loved that stuff SO MUCH! I would intentionally put too much on my salad so that I could (here’s where it gets gross)… DRINK IT!

Well, I thought I had outgrown that temptation, until I made THIS!

1448132919184

CREAMY GARLIC SALAD DRESSNG

  • 1/2 cup extra virgin olive oil
  • 1/4 cup apple cider vinegar
  • 3-5 cloves of garlic (crushed)
  • 3 Tbsp. fresh lemon juice
  • 2 Tbsp. chopped fresh parsley (dry works fine too!)
  • 1 tsp. Himalayan sea salt
  • 1/2 tsp Dijon mustard
  • 1 Tbsp. raw honey or agave nectar

Place everything in the blender and blend for 30 seconds or until combined. Store in an airtight container (I like mason jars) in the refrigerator. Be sure to shake it well before using after refrigeration.

If you follow the 21 Day Fix, this counts as one orange container.

I love making my own dressings. It’s so easy and I know exactly what’s in it! I also know what’s NOT in it! No additives, preservatives or other chemicals. I like to shake mine up with my salad to cover every little leaf! That way, a little goes a long way.

And if you used a little too much, you might be tempted to drink it!

Enjoy!


WHAT’S ON SALE?

Current & Upcoming Groups